Warung Bebas
Tampilkan postingan dengan label costumes. Tampilkan semua postingan

Rabu, 11 April 2012

Costume cross-section- Baby Jane Splicer


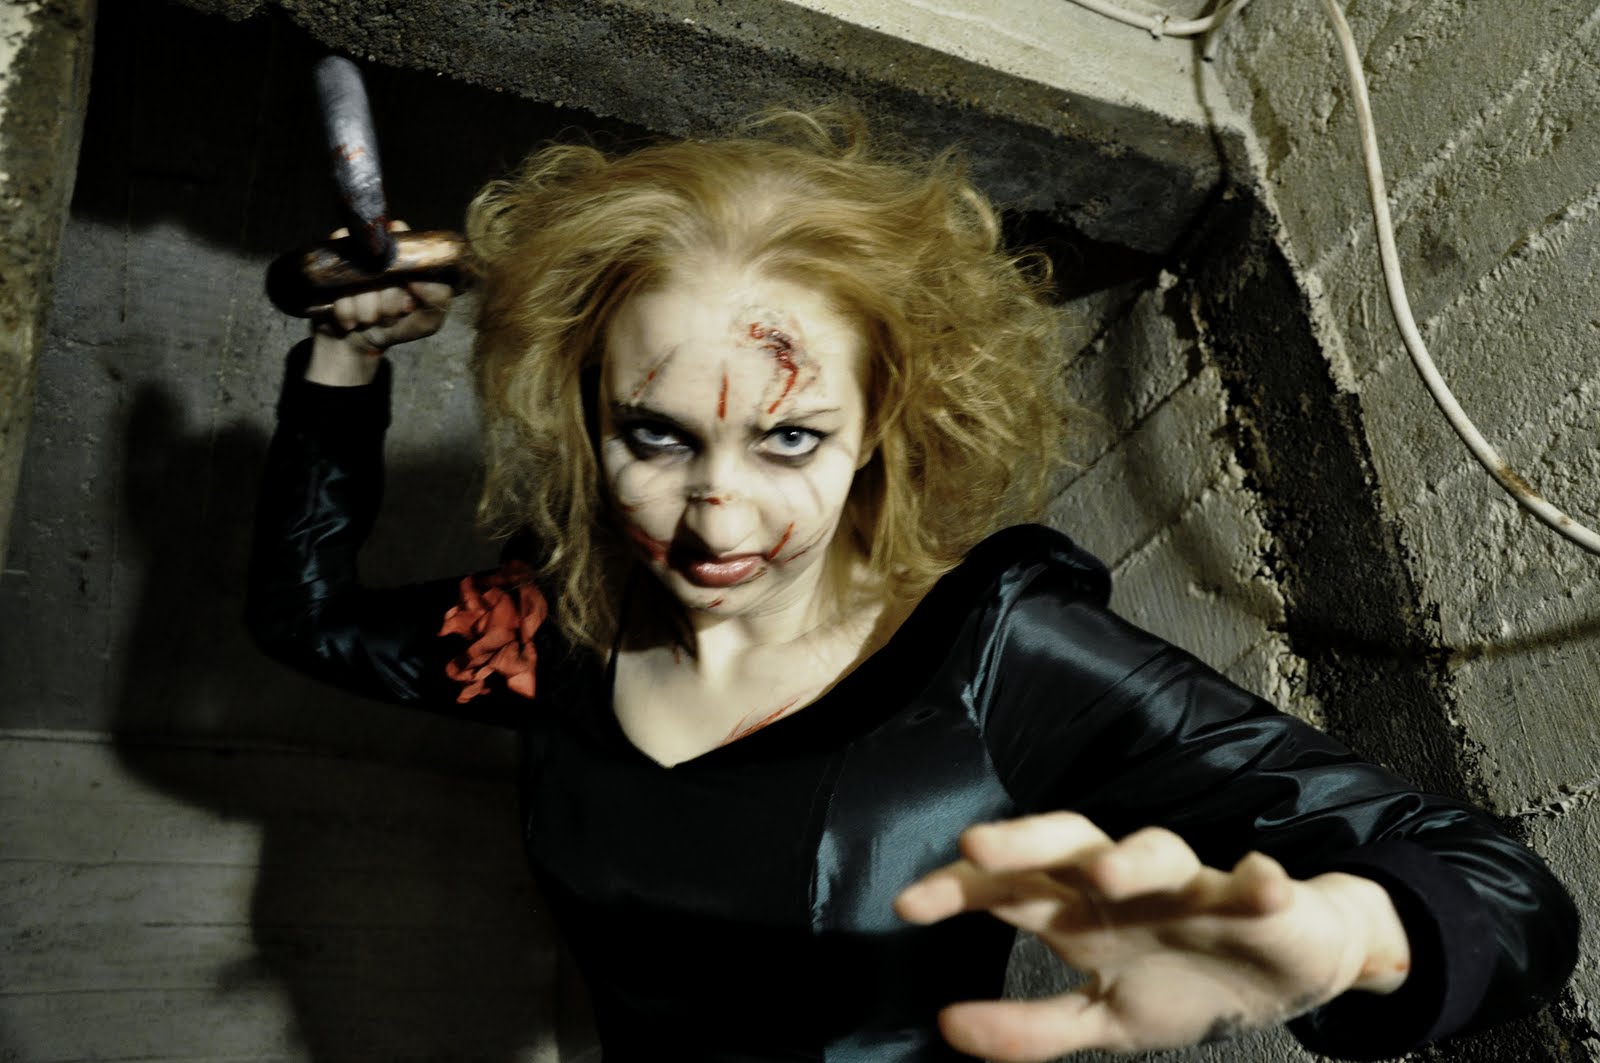
My splicer costume has only three different pieces; dress, hook and a stay-up sock. If I ever wear Baby Jane again I will finish the other hook and definitely wear a wig, since my own hair wouldn't do anymore. The wig I have planned for Baby Jane is again a remnant from last decade. The bob is actually going through one of my experiments, which this time is dyeing with ink. I might tell about that ordeal later on.


The dress was rather simple task to complete. Based on the reference pictures, the cut was easy to transfer to basic pattern, as the seams follow quite faithfully the darts on the front. The dress is made from taffeta that shifts between dark green and black. The cuffs and the collar I made from some navy blue scrap velvet, which had been conserved into the depths of the sewing locker for over ten years. Now I finally found use for it! Thank goodness, my memory served me well. Cotton velvet is so damn expensive!


I added a lining on the bust and sewed plastic boning on the seams. Hidden zipper is on the back seam and the dress has too removable navy blue shoulder straps. The hem was constructed what was left from the fabric after cutting the bust and the sleeves, which I two-pieced to get the right fit. I tore the hem with scissor and added an old fake rose on the bust.


I laughed a lot while trying to take a photo of the stay-up sock, but I think you might get the idea… I didn’t want to buy a pair of socks just to destroy one, so I made one from pair of old pantyhose. The upper part of the sock or the panel is made from the crotch part of the stockings, as its bit more durable. The suspender is just a piece of black elastic band.


The hook has its own construction post. For painting the hook I used acrylics paints, mostly grey with hues of silver and copper with black on the weathering. The red is theatrical fake blood, still tacky after six months.


The make-up had rather regular composed feel to it, but this time I used make-up latex with tiny pieces of toilet paper to make the scars, with touches of fake blood. I especially liked how my knee turned out, even if it didn’t show in any of the photos. And about the black tooth lacquer… it tastes horrible.

Jumat, 09 Desember 2011

"I don't wanna be a real boy"

The end of the year is closing in with rabid speed, so I thought it would be good to look back in time and see what has been done. However, my pendulum faced a critical malfunction and tossed me all the way back to the year 2007 and our second pair cosplay.
The first armour, or more likely body, we ever made, belonged to a redheaded puppet master, whose peculiar frame has raised many questions. My new mission was to retrieve the armor from the depths of a wardrobe and make a short briefing about it, answering the scattered questions.


Rabu, 30 November 2011

Cosplay memoirs: Mayuri Kurotsuchi and Akon from Bleach

After browsing through old folders I had to make a post about our third cosplay together. We did quite many things with these costumes that we had never done: Yoki worked with insulation foam and I had a lesson from make-up and prosthetics, if Akon’s horns can be called that way. We attended to two different conventions with the costumes. Mayuri and Akon was our second day duo. The first day we wore Sasori and Deidara. The order was everything, because otherwise Sasori would have had weird dark smudges on his face.

What we learned from Mauyri and Akon was that always try out full face make-up beforehand. The morning was one of the most hectic ones we have ever had. Curses, oh the curses. Of course it took few years to rub in, because about year later the morning we got ready with Jasdero and Debitto could not be called calm in any way. In my opinion we survived quite well with Luminara and Barriss this year. Ho-ho, that's four years later...

The photos are taken from Ropecon, 2007.

Minggu, 30 Oktober 2011

Baby Jane made her first appearance


Even if my Halloween didn’t go quite as I planned, I got my Baby Jane costume ready for a test shoot. Yesterday I scraped together the accessories for the costume; a corsage that I happened to find from my drawer and a black stay-up.

I couldn’t force myself to buy a proper pair of stay-ups just to ruin them. Instead I took a ridiculously cheap pair of stockings I had lying around. I cut the legs and made the wide top panel from the upper part of the pantyhose. Then I just sew the pieces together with a serger. I haven’t weathered the dress aside from cutting and tearing the hem, so there is still some smearing, ripping and burning ahead.


For the make-up I used different eye-shadows, some grey crème make-up, red lipstick, fake blood and 3D-gel. This was my second time working with the gel and I think I made some progress with it. The only down side this time was that the gel didn’t stick. It started to peel away especially around the mouth. While teasing my hair I came to a conclusion that I might buy a wig for this particular cosplay even if I didn’t originally plan to. I’m trying to decide whether to go with the concept art style or the dark bob. The bob is actually starting to intrigue me more and more.


By the way, is it just me or does anyone else get a questionable 80’s vibe from the dress?

Rabu, 14 September 2011

Costume cross-section- Barriss Offee


In our version of Barriss’ costume there is seven different pieces; cape, scarf, cowl, dress, belt, shoes and lightsaber. I’ve seen other costumers and cosplayers with different solution. Some have done separate shirt and skirt or cowl attached to the cape itself. You can’t really tell how the costume is constructed when it’s on, so I went on with a way that was most suitable for us and my way of costume making.

The cape fabric was something we really searched for. Finally we accepted this synthetic fiber mix we found from local fabric store. It has velvety or brushed cotton type surface, but the inside looks like what you would use in a shell suit. Gladly, the printing emulsion worked on the synthetic fabric. We used a stencil roughly a size of an A4 sheet and used pearly blue and silver opaque colors from EMO-tuotanto. Needless to say, the process took days! Still it was bit faster than printing Luminara’s cape.


The cape is pretty much straight pieces of fabric. The back is gathered to eight large folds, which I sewed on a shoulder panel. The front is double layered and lifted from the front to the tip of the shoulder and sewed on place. The hood is patterned rather freely, it’s supported by iron on backcloth and the whole thing is lined with black acetate. The cape has hidden hook fastening on the front.


The scarf is actually my old “pashmina” scarf I bought for few pounds from London. I just cut it in half and thus sacrificed it to cosplay goddesses.


The cowl is sewed from leftover pieces of the cape. It fastens with hooks on the back of the neck.

The dress has four different fabrics on it. The top layer of the shirt is made from two crinkled and detailed tricot fabrics. As a lining is used lycra tricot on the bust in two layers to prevent transparency. The hem is made from heavy knit fabric with 5% elastane to ensure decent fall and flow. To make the look on the middle section of the bust according to references, I sew pin tucks for more detailed look.


The hem is half circle as the upper part of it is more or less like a tube. I sew the shirt part and hem part separately and joined them as a last step. If I wish to change the hem, the cut on it is slightly lower than the reference because in my mind it fitted Yoki’s physique better, then I can do it easily without having to seam rip the sides.


Yoki made the belt buckle from pulp board, craft foam and some yarn. Here is a link to a post she made about it. The belt is made the same way as Luminara’s; with brown pleather on top and awning fabric on the back to give support. Barriss’ belt is little darker than Luminara’s, so I used a sponge to rub dark grey acrylic paint thinly on the pleather. It actually worked really well. The acrylic set on the pleather nicely and didn’t crack even if I tried stretching it.


The black boots were found from same second hand shop as Luminara’s. There are five decorative buckles on the sides and reasonable heel to walk. Price for the boots was something ridiculous, like ten euros.


The lightsaber Yoki made from pulp board tube this time from plastic wrap container, craft foam, putty, black electricity tape, silver spray paint and finally screws and plaster buttons as details.

Rabu, 24 Agustus 2011

Costume cross-section: Luminara Unduli


Luminara's costume consist of ten different pieces. From top to bottom; headpiece, cape, brooch, shirt, arm guards, pair of belts with large buckles, waist cloth, skirt and shoes. She is also carrying lightsaber somewhere under her cape.


There is actually a pair of post, where I go through the construction of the headpiece. In short, it's made from mosquito net, modeling paste, small piece of foam and few different fabrics. The trim on the head piece is still not finished, I still need to add two decorative ribbons to it.


The cape ate five and half meters of brown wool, which I printed by hand. I used black pigment and the base emulsion for fabric printing from EMO-tuotanto. It was bit risky to use the colors on wool, because they are meant for on cotton and cotton mixes. The printing process took several weeks, because I had to do a negative print, meaning that I had to cut the pieces separately.


The idea for the pattern came from Yoki. After browsing through Rebel Legion forums I found credible verification for the plan. The whole body of the cape is actually one big piece of fabric. The sleeves form when the fabric is pulled from the hem up to the shoulder. There is narrow yoke on the front with snap and hook fastenings.


The back of the cape is heavily draped. The drapes are sewed to piece of fabric tape on the waist. The hood is only for a show. How would you wear a hood with the huge headpiece anyway? I modeled the hood on my fitting dummy before sewing it on the cape.


The base of the brooch is pulp board. The rest of the body is modeling paste and hand-twisted wire. The brooch is painted with acrylics. The body is black and green mixed together and the wires are copper and gold. I used a tooth pick to paint the wires. The fastening is a safety pin, which is glued to the brooch a with a piece of fabric.


The shirt fabric was originally beige cotton tricot. I machine dyed it with cotton lace I used on the skirt. The pattern of the shirt is pretty basic. The front panel is striped with crooked pin tucks on the wrong side of the fabric. The ribbons are braided from strings of pleather. The high turtle neck has a zipper on the back, so that the garment would be easier to get on and off.


The arm guards and the front cloth are made with same materials and techniques. The figures are craft foam painted with acrylics and glued on brown leather. The details are made with different tools, like hair pins and a seam ripper. The arm guards fasten with Velcro, which is actually movie accurate solution. The cloth fasten with Velcro to the belt higher on the waist.


The belts are made from brown pleather. They both have black awning fabric as lining to make them sturdy. The belts fasten from the back with to poppers. The buckles are made from pulp board and paper. They are painted with acrylics in gold and copper and weathered with watercolors. I like to use watercolors instead of acrylics, because they stick too fast and don't spread well even when rubbed.


The skirt has two layers. Ribbed, black cotton forms the first one with cotton lace that I had dyed earlier. Black cotton acts as lining underneath to give support to the first layer, which would be too limp alone and not hold the required A-line form. I had my old petticoat with two hoops the first time I wore the costume.


The boots are brown leather with warm tone, even if the color looks grey on the photo. There is three copper colored buckles on the side and moderate wedges. And they were found unexpectedly from a second hand shop for seven or eight euros. Good bargain.


The lighsaber is made from a pulp board tube stolen from aluminum foil container, soft foam, glue, putty, screws, plaster buttons and black tape. The body was painted with silver and chrome sprays and the golden details with acrylics. I like the result a lot and the fact that is was virtually a free prop. All the materials used was found from our cosplay workshop.


Writing this made me realize that there is still some work to do with this costume like dyeing the cape darker and making the decorations on the headpiece, but I think I'll manage to finish everything before the next wear, which will be at Tampere Kuplii next spring.


Selasa, 26 April 2011

Snowtrooper: Costume assembly

Our Snowtrooper costumes consist of sixteen different components per set: pants, shoes, knee plates, crotch piece, abdomen plate, pouches, thermal detonator holder, jacket, chest plate, shoulder straps, backpack, shoulder bells, arm guards, hand plates, gloves and helmet. In this post I will go through the fastenings and assembly.


The crotch piece has a plastic buckle on the side on a canvas strap. The buckle was placed on the side, because opening the buckle would have been hard to find the buckle under the cape with thermal detonator etc. on the way. The pouches have double loops and they hang on canvas belt, which goes through the abdomen plate. The belt has a plastic buckle on the side. The thermal detonator holder has two aluminum "loops" to keep it on place.


The knee plates has elastic band glued inside the outer edge of the piece. On the inner side and on the end of the elastic band is Velcro.


The shoulder straps are fastened to the chest plates with screws and nuts. Between the strap and the chest plate is craft foam cushioning, so that the parts would sit tightly and not scratch each other. The canvas straps of the chest plate suspenders and similar straps with D-rings for the backpack connects to the same screw. The harness is fastened with a plastic buckle on the back.

All the parts from the chest set. Here you can see how the chest itself is constructed from four pieces.

The arm guards have elastic bands on the wrist. The cuffs on the guards are craft foam. The palm plates attach to the gloves with Velcro as well as the shoulder bells to the jacket. The backpack has canvas straps with Velcro glued and screwed on it. The straps slip trough the D-rings when worn.


The helmet has cushioning on the forehead. The buckets are actually so form fitting that they don't need anything else. The visor is attached to the dome snugly with Velcro. I wanted the visors to be removable, if we ever needed to pack tightly: the domes can be stacked, like almost all of the armor parts in the costumes. That is also why the back cowl on the helmet is taped on and not glued.

Front.

Back obviously.

Sabtu, 25 Desember 2010

New Akatsuki undies


The material I chose for the undies is 100% polyester, even if it looks like cotton. The fabric is also really elastic. Moving around and doing low, open poses is well enabled. Even with stretch I placed hidden zipper in the side seam. Our previous ones where tricot and they had rubber band inside high waist piece.

I used was regular trousers pattern for the pants. I left darts for tight fit on the hips, took out some looseness on the thights and knees and flared the legs out. Without the shin guards or leg warmers, which ever you prefer, the pants look like cropped hippie jeans. When you tuck them inside the shin part they look great!


Nothing much to say about Deidara’s belly shirts. Like every Deidara cosplayer out there and pretty much everone who have read Naruto, I wonder why he wears one. Ignoring the questionable fashion taste, the upgrade is complete!

Minggu, 12 Desember 2010

Moonlit Mireille


In "Moonlit tea party", which is eleventh anime episode of Noir Mireille is wearing white men’s shirt. How convenient! I just happened to have one in my closet! Months ago I found a perfect tea cup from flea market and started to wonder if I should scrape together the tea party outfit. And yesterday I did. It's not much of a cosplay, but a nice snack in this current costume silence. I could have chosen a better occasion for the photoshoot, which pretty much contained me, camera, tripod and a cup of tee about 5 AM. Creativity doesn't ask for the time or the place!


With the shoot, I got an opportunity to see how the styled wig looked with contacts, fake lashes and make-up. The wig is years old, bought from Estonia. It's rather good quality, thick and easy to work with. Tangles fall from the wig with ease or then I just have the patience to comb wigs properly these days. The photos came up nice, even if the lighting was dim and I used my new camera first time with tripod and timing. But the atmosphere mediates. I really tried not to make it sleazy. Well... bed room sets are always sleazy!

Twitter Delicious Facebook Digg Stumbleupon Favorites More

 
(˘̀^˘́҂)ҧ Design by uncensored8 | By Maling Durjana DMCA_logo-200w Pelacur Gratis Fast loading | Sexy Analytic (˘̀^˘́҂)ҧ