Warung Bebas
Tampilkan postingan dengan label costume making. Tampilkan semua postingan

Selasa, 09 Oktober 2012

Casting with Formaform


When I was constructing the troll costumes, I wanted to try something new in form of casting and mold making. Both of our trolls have harnesses with buckles, so I ended up casting the fastenings from polyester in a Formaform mold.


Formaform is a synthetic and elastic rubber material for mould making. I bought the smallest package, 1,25kg from Hobbypoint, Finnish crafting store. The package contains three different ingredients; granules, liquid and Thermolan, a type of a hardener.

The granules smells pretty bad, but its environmental friendly and you can use it over and over again by cutting it to pieces and melting it again. Nice plus if you haven’t made molds earlier and mess up the first ones, like I did. I think the process pictured below is my third try. Read the instructions well beforehand. You never know, if I cut some corners.


First you need to prepare the working space. What you need is a stove and a retired pot, a scale for measuring, wooden sticks or spoons and cardboard cups. Then you need a container for the mold. I used a juice tetra which I cut in half and strengthened with tape. The master piece is taped to the bottom of the contained with two sided tape. The wall of the mold should be at least 6mm thick. That should be taken inconsideration when choosing the container.


Before I started to melt the Formaform, I sprayed the master with silicone spray. Then I measured the ingredients; granules and liquid in ratio 100/40. I turned up the stove to medium heat, poured the ingredients in and started to stir carefully with a wooden spoon. You don’t want air bubbles. The stuff is ready as soon as it turns liquid. 


I poured the stuff on the mold container and checked the master’s surface for any air bubbles. I pushed the bubbles out gently with a paintbrush.


Then the mold needs to set. The time depends on the size of the mold from half an hour to hour. Formaform will turn rubbery. When that occurred I carefully removed the mold from the container and pulled the master out. I trimmed the edges and check the mold.


First two molds weren’t good enough, so I just chopped it up and melted it again. The third one was almost perfect, so I let the mold cure 12 hours before the next step. At this time the mold will lose some elasticity, but remain rather flexible.


 Because I was using really strong, industrial material for the casting I had to reinforce the inside of the mold. Otherwise the polyester pull would tear the mold apart. Formaform comes with a bottle of liquid that is used to make the mould heat resistant. It hardens the inside of the negative mold so that it can endure materials like resin and hot wax. 

I poured the liquid on the negative and let it set for ten minutes. Then I just poured the stuff out and let the mould cure until the inside had felt solid as the rest of the mold remained rubbery.


Then it was time to mix polyester filling with hardener and pour it into the mold. I recommend using a respirator and pair of gloves when working with irritating stuff. If possible work in steady conditions, in room temperature if possible and not in direct sunlight if you don’t want to ruin your cast or the mold itself. Again, been there, done that.


It took about 45 minutes for the polyester to cure to a point it could be pulled out of the mold. I let the buckle to harden overnight, trimmed it with utility knife and painted it.


In all, it was nice challenge to try something different and because I needed a handful of buckles, it was more affordable to cast them than buy them. And now I have materials for future projects. But next time I’m going to buy more suitable casting material, since the polyester filling I used was bit too strong for Formaform. The last pull I did tore the inside of the mold pretty badly.

If you want more information and approach to mold making, check Rullarinkeli’s blog. Instead of Formaform, she used Vinamold. And there are videos too!

Jumat, 13 Juli 2012

Show me your teeth, mon!

I continued on the path of prosthetics and happened to solve our teeth problem sooner than I expected. Again I learned that talking to someone about your construction problems might actually help you, offer you ideas or even solutions. I casually started pondering to our mom that I had no clue how to make the teeth to our trolls, so that they would be reasonably priced, fairly safe and durable. I don’t actually remember what she said to me, but it lead to creative frenzy, which gave birth to a set of teeth with teeny-tiny, pretty tusks.


I’m currently making set for Yoki and trying to take photos so that I can make a construction post about them. From my set I can only show you the final result.


Materials used: modeling clay, latex and drop of acrylic paint.

 Smile!

Rabu, 11 Juli 2012

Loose facial features


Our troll project is slowly making progress. Next to the wigs, I have sketched out the outfits for all three of us and some I have already started sewing. The weapons are on Yoki’s drawing table and the performance has also been somewhat decided. The prosthetics were the only big costume section I had left aside. I kind of avoided it a bit too, since it was something I wasn’t familiar with. But yesterday I grabbed the bull from its horns… or troll from its tusks! However you like to put it.


I started from taking a cast from our third party member’s nose and sculpting the master molds for our ears. I’m going to make the nose by casting latex on a negative mold and the ears by brushing or dipping the positive molds on latex. Or that is at least what I have planned. I’m not sure which method is the best, since this is my first time working with latex.


Today I finished the positive sculpt for the nose and made the first “casting” test for the ears. The male tusks I'm going to solve with ready-made product, but the female teeth issue is still wide open. I'm still looking for a right solution with them.

I want to thank my good costumer friend Batsy for providing us with the latex! You can be sure that I will shortly have a pile of questions prepared.


Selasa, 26 Juni 2012

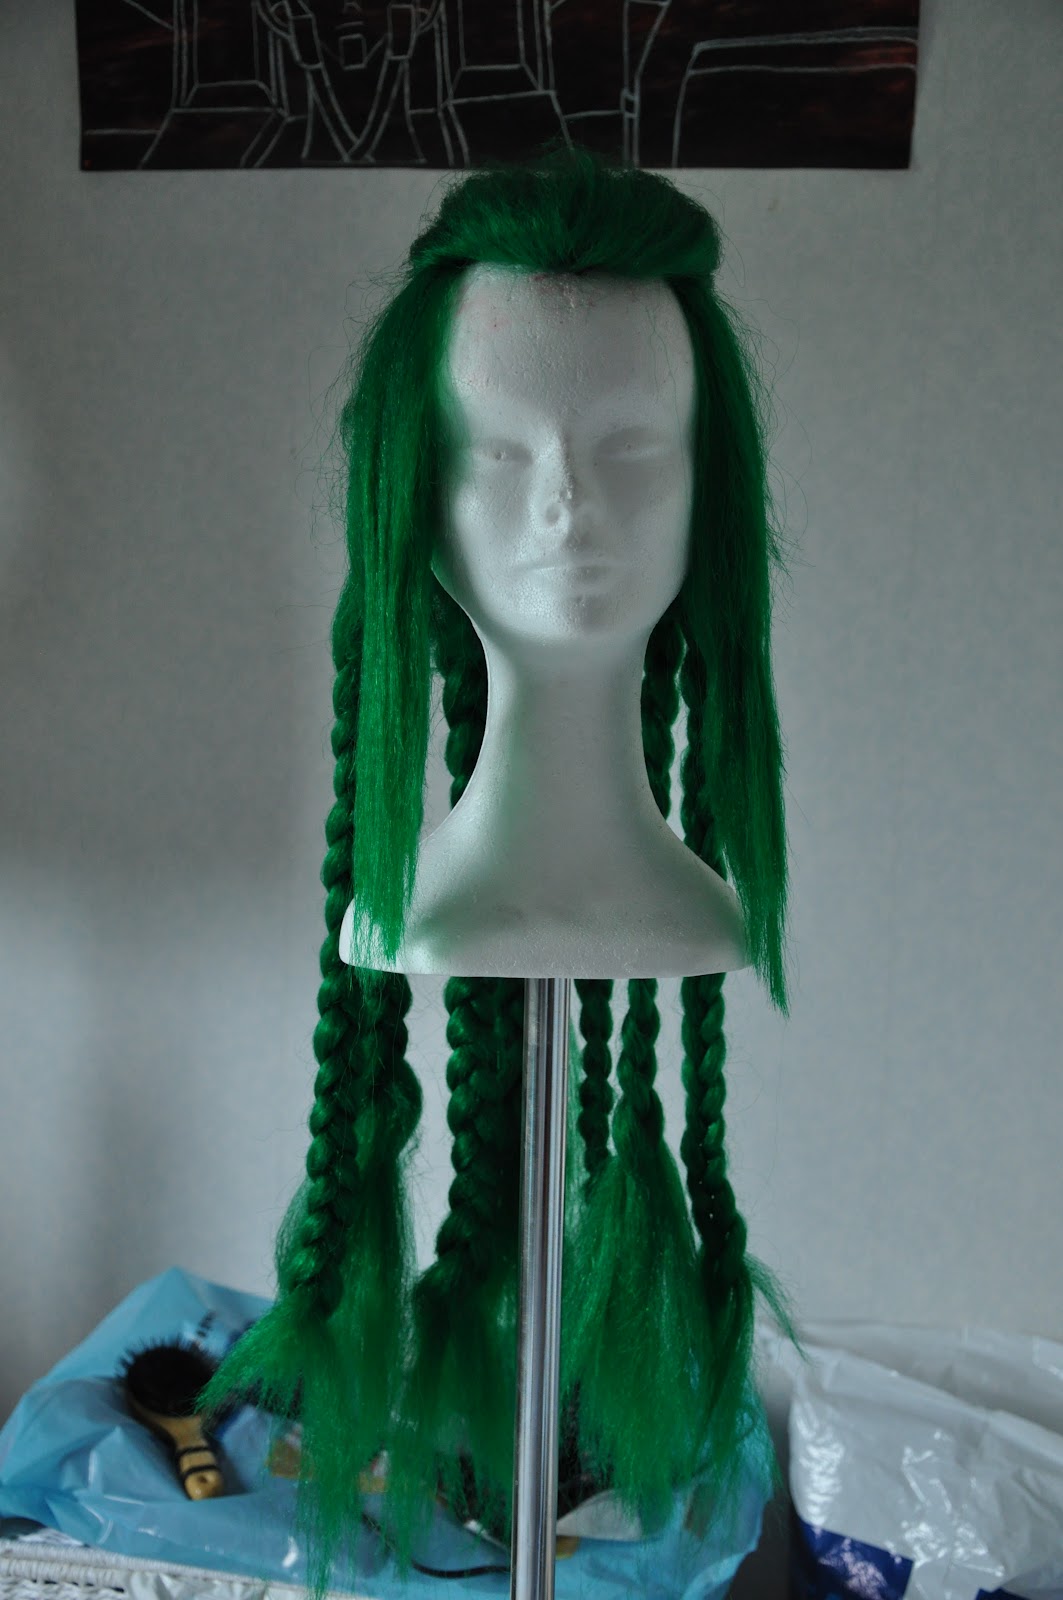
Wig making from scratch

Since midsummer celebration provided few extra days off work, I decided to start one of the bigger projects concerning our troll costumes. That is one more wig in crazy color scheme and wild styling. I styled two previous wigs from ones I've bought to make sure we have enough of them in case of urgent need… not like I’m a hoarder or anything. But this third one I decided to build from scratch, since it’s something that I haven’t ever done before. And I happened to find really cheap jumbo fiber, which might have affected the decision.

I started from the cap. I bought lining that is used on sportswear, pretty similar to fabric in hockey shirts. I used a wig head as a model when deciding where to make seams, keeping in mind that the Styrofoam head is smaller than normal human head. 


The basic shape contains three pieces, sides and the top. Forehead piece is double as well as the small pieces on the back of the neck, the temples and piece on forehead marking the hairline.


Then I started sewing wefts. Whole lot of them, from the three packages of fiber I had purchased. I used iron-on interfacing as the “root”. In my experience the weft is rather solid after ironing and doesn’t suffer from hair loss as much as tulle weft would. I even brushed the wefts quite heavily and only few strands came off from each.

The jumbo fiber is creped since it’s usually used in braids or dreadlocks, which actually works with my intentions. But still I wanted the top layer of the fiber to be smoother. I’ve scorched some wigs in the past, so I was extra careful when choosing the straightening method. I decided to give the iron a go, because I’m inpatient person when it comes to costume making. Waiting the wig to dry would have been a torture for me, if I had used the method of pouring hot water on the wig. 


I sprayed the weft with the iron and gave it few presses of steam to pre-heat it, not letting the iron’s bottom plate to touch the fibers. Then I placed the weft between layers of pattern paper; two layers under and two on top. Holding the weft from the root I pressed down the iron and at the same time pulled the weft under it. The trick is to keep the weft moving. If you only press the iron on the weft it will most likely start to melt. Been there, done that.


Then I repeated as many times as needed, spraying the wefts with water if they seemed too dry. And the iron was quite hot, between two and three dots.


I sew the wefts on the cap by hand. It seemed the easiest solution and didn’t mess the fibers too much. To prevent creating a tangled mess, I sprayed the wig with balsamspray from Gliss. It works with the synthetic hair almost as well as real hair. I highly recommend spraying the wig either outside or covering the floor under your working area. The spray makes the floor quite slippery and adds to the risk of cosplay casualties.


After I had sewn all the wefts, both straightened and untreated ones, I took a blow dryer, sprayed the wig again with the balsam and went through the fibers with a wig brush. This relaxed the creped fibers a bit and made the wig look bit more tamed.


Then I tried with some braiding techniques. I think I found the right one to use, but before I actually manage to fit the wig on the person who will wear it, I will keep the regular braids on it. I will report in when I have finished the green goblin. 


Making a wig from scratch isn’t actually that hard if you have styled wigs before and don’t bother sewing a whole lot of wefts. I might even give wig making a go in the future with straight fibers. The most crucial part might be making the cap, especially if you are making it to someone else. Thank goodness the head sizes don’t vary that much. I say and cross my fingers.

Jumat, 25 Mei 2012

Towels and stuff


For the celebrations of annual Towel day, we got geared up the proper way.

 It always comes back to the sanding paper.


What do you mean 'I have no fashion sense', this is a perfect working gear.


Hiron changed her mind about spending Desucon Saturday in casual clothes. She dug up a costume project which she started about two years ago. Mireille Bouquet, codename Noir. High ranked assassin and a fine woman... except her purse is really... pink.But Hiron made it, because she loves bags almost as much as hats and headpieces.

Jumat, 20 April 2012

Troll toes trial no. 1


Since I don’t have anything under construction right now (except for few fancy dresses for summer and a quilt works), I thought to continue our troll project with experimentations on the foot-side. It’s weird that WOW troll has three fingers but only two toes! The asymmetry is rather weird, but I will roll with it. The fingers I’m going to solve by sewing custom gloves, but the toe matter is bit trickier. I’ve seen costumers making the feet over boots, but I wanted the toes to look like they bend and act rather naturally. And I really want to make the feet look good, since people seems to loath them so much.

I’m pretty sure that I’m going to make the toes out of foam. The “how” is the thing I’m still pondering, but my first trial gave a good base to the future construction.


First I kindly asked Yoki to lend her foot so that I could draw the outline on a piece of foam. After that I sketched out how the fake toes would look like and how they are placed compared to the real toes. Then I cut away the inner section and the excess around the troll toes.

When I had the first piece ready, I copied it on another piece of foam and cut the top part of the foot. I rounded the edges and carved the inside of the top part hollow so that it would sit nicely on Yoki’s foot.


Then I trimmed the pieces until they looked fairly nice. I also added creases to where the toes might bend naturally.

Then I had a problem. These two photos show how I try to find a solution to how to wear the damn think and how to fade out the angularity of the cut edges. I ended up using the stockings for the trial.


I’ve bought a pile of blue stockings to be used as pieces of bodysuit for the trolls, but for the trial I used regular lycra to act as skin. After sewing a tight fitted sock I stuffed the toe part inside. I screwed up the pattern, but the idea worked quite nicely. Yay, for troll feet!

Twitter Delicious Facebook Digg Stumbleupon Favorites More

 
(˘̀^˘́҂)ҧ Design by uncensored8 | By Maling Durjana DMCA_logo-200w Pelacur Gratis Fast loading | Sexy Analytic (˘̀^˘́҂)ҧ